

Today’s review focus is on the Hornet Plugins ChannelStrip MK2, a virtual channel strip which seems to be running slightly under the radar for a lot of users.
I have to admit, I am a Hornet Plugins user, and I do have an eye on their creations for a while now. I got a license of AutoGain in my possession, which is a great helper for gain riding of certain signals. At clients rigs, I also used other tools like the SW34EQ and the IMO more than excellent (not to mention affordable) VU Meter.
Because of this, some might definitely think that I could be biased with my opinion in the following paragraphs. But those that know me personally, or from KVR Audio, know that I am not hesitant on giving honest opinions in terms of plugins. Sometimes even backed up with plots and what have you.
Taking A Closer Look
After buying the plugin (information: no user account, each order is handled manually), Hornet Plugins’ creation ships, at the time of this review, as a ZIP folder. In it are installation instructions, a PDF manual, and two sub folders with either the Mac or the Windows plugin versions.
What might be a surprise to those who are not used to meddling with OS folders and just want to install things is the fact that there is no installer. There could be ongoing debates about why going such a route. Let’s just say that unskilled users might be initially lost in terms of what to do. Thankfully, there is an installation guide, which describes where each plugin has to be placed.
After the installation, there is no need for any plugin activation with a serial or call/response system. The plugins don’t use any form of copy protection, as the developers don’t believe in that. Just install, and start working!
The manual is sadly a bit short for my tastes. I am an audio engineer – I am looking more at the technical side of things. But it is not boring you with techno babble, so you can get a grasp of things and start right away. Though I always recommend to take plugins for a test ride with analysis tools first. Which helps understanding how the tool in question is working.
Looking Under The Hood
The plugin performance is exceptional. It does not introduce any latency, so it can be used for both tracking and mixing. The whole engine can be oversampled (which is advertised in the manual as „intelligent – where needed“) and it does come with a very low CPU load.
On my studio rig (which is still an Intel Core i7 920 Bloomfield overclocked to 3.6 GHz, RME HDSPe, 128 samples buffer), 64 instances of ChannelStrip MK2 with Analog Mode engaged, register about 25% ASIO load on the Cubase 7.5 (x64) ASIO Guard. If oversampling was activated as well, we see an additional 10-15% load for these 64 instances.
Keep in mind, we are talking about a channel strip with two compressors, and one EQ. You basically don’t need much else anymore per host channel, other than send FX. I call this a great performance.
Layout And Main Features
The plugin concept consists of an input/output module, two compressors with four different modes/characteristics, and a 5+2 band full parametric EQ (two LP/HP, two Shelving filters, three peak/bell filters). I’ll get more into detail with the EQ in a minute.
The plugin offers an input and output gain/trim ranging from -60 dB to +30 dB. Furthermore, each module offers an input and output gain/trim as well, which ranges from -40 dB to +15 dB. In theory, you can boost your signal until infinity (if needed, which is possible if the analog emulation mode is turned off), but it’s actually offering a way to properly gain stage the signal from module to module. The input/output gain/trim at the top can be double clicked, and numeric values can then be entered. Something that doesn’t work for the gain/trim faders per module.
Sadly, the VU meters of the modules are really small, and there is no numeric readout. But the plugin itself is calibrated to -18 dBFS = 0 VU, the meters are color coded. Everything that goes beyond -18 dBFS (0 VU) and higher, the meter turns yellow. If the signal goes above -15 dBFS (+3 VU), the meter turns red. While this is in my opinion great for monitoring bass intensive content, it disregards transient heavy material a bit. Keeping an eye on the host’s digital meter is definitely recommended. Especially if you reshape transients with a compressor.
The compressors offer 4 different modes: VCA, FET, OPTO and an EXPANDER. According to the manual and the official demo video’s, even calibrated to their inspired by real hardware counter parts, along with their limitations. Though some of them were lifted. For example, you have free control over the ratio (from 1:1 to 20:1). Which makes the compressor highly versatile for all kinds of signals, but are ultimately their main problem (see below). I am also a bit disappointed that the expander mode wasn’t explained in the manual.
The EQ is inspired by several analog models, with characteristics like „resonant low shelf“ (as seen in passive equalizers), „aggressive high shelf“ (think SSL), HPF with 18 dB/oct slope, LPF with 12 dB/oct slope and full parametric peak/bell EQ filters. The frequency band labeling can be a bit misleading. The „mid“ band for example goes from 20 Hz to 12 kHz, while the Low Mid only goes from 200 Hz to 2.5 kHz and the Hi Mid from 600 Hz to 7 kHz. I kind of expected a different arrangement, so reaching for the low mid to boost certain bass frequencies is not as intuitive. But it’s still easy to handle. The gain/trim per band can be +/- 15 dB with variable Q for the mid bands.
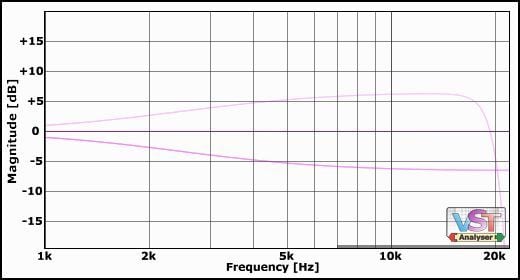
FR of the Hi Shelf at 8 kHz, boosting/cutting +/-6 dB (LPF is at 20 kHz).
I do give the advice however to really take a closer look at the EQ with an analysis tool like old Christian Budde’s Plugin Analyser. Sadly, the manual is lacking plots to show the behavior of the individual bands. I found out for example, that even if the LPF is at 20 kHz (maximum) once you boost the high shelf, the LPF is still engaged and cuts off at 20 kHz. If you trim the high shelf however, the LPF is disengaged unless you pull down it’s value. This is IMO important to know right from the start.
And finally, the „Analog Emulation“ mode. This introduces a harmonic fingerprint (saturation) and a small variance of frequency response between left and right channels. Additional to slightly shifting filter behavior for all modules, The saturation is barely noticeable to pleasant (if not overdone, THD is at -62.4 dB with a test signal of -18 dBFS). But this mode engages saturation for all modules. It can’t be used individually.
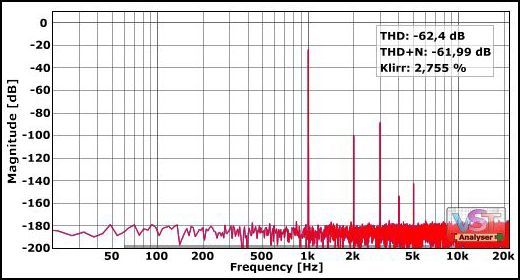
A THD plot showing the saturation, measured with -18 dB.
It looks to me as if there was one preamp used for the plugin chain that the EQ and compressors then simply process. Here, individual per module would be nice. But I do get the aim at this plugin being a channel strip, not a highly surgical tool.
In Actual Use
The plugin in itself is pretty straight forward. You have an input/output gain/trim module, which also takes care of the global analog, phase inversion and oversampling mode. The compressors and EQ are connected between the global input and output.
The routing of these modules can be set as desired. For example: Expander > EQ > Compressor, or just EQ > compressor. But you can also pull off various compression tricks as known from the old days. i.e. compressor (transient handling) > compressor (softer compression) with the EQ either pre or post. Though since the FET compressor’s attack/release can’t be turned off (except for setting the ratio to 1:1), and the modules don’t offer an individual saturation scheme, the infamous 1176 preamp trick can’t be done.
The routing capability does come with a price however: you can only move the modules up/down one slot. Or better said, only the EQ is really versatile in its position. Compressor 1 can’t be moved post compressor 2 and vice versa. So if you set up compressor 1 with a nice FET setting, but realized „Wait, I could use an expander to clean up the track!“, you can’t pull that module to the first place. The EQ however can be at position 1, 2 or 3. There is no limitation – though it is a bit jumpy and I’d prefer a drag and drop feature (like with Slate Digital’s recent creations, or Eventide’s channel strip). This was not addressed in the manual.
In terms of the compressor, the release is also a bit tricky to set up. Especially if you work with fast to moderate fast release times (read: between 50 and 300 ms). Either a double click on the numeric value does the trick, or SHIFT + mouse drag and keeping an eye on the knob range. If you’re a mouse only jockey however, this is not fun. Switching between compressors also doesn’t offer a shared value system. What is 200 ms release in VCA mode, is 85 ms in FET mode. Here I’d wish that the numeric values stay the same, but the knob positions would adapt. Doesn’t work for the different attack of course (FET in microseconds area, VCA in milliseconds).
A couple of other things that I didn’t really like with this channel strip, are i.e. the input/output gain/trim faders per module. They are small, you can’t set them according to a specific numeric value. You also can’t really control the output gain of the compressor (due to a lack of a make up gain knob). A gain reduction of (maybe desired) 20 dB can’t be compensated with the output module as it only goes to +15 dB. In theory, you need to use the input gain of the next module to balance out the signal. Taking a look at the original hardware FET (1176) – it comes with a fixed threshold according to the used ratio, while the input drives the signal into the threshold and the output is for compensation. You have to think different in Channel Strip MK2.
Speaking of handling, the GUI is just too small for my tastes. We talk of a GUI size of roughly 460 px wide, and 640 px in height. Great for old rigs with small screens, and yes we have to take host window borders into consideration. But I use 22″ flat screens with a 1680 x 1050 (16:10) resolution and sit about 1.20 m away from them. Even with optical aids (read: glasses/contact lenses), the GUI is really hard to read. Namely the numeric values. Now imagine users with 27″ screens at currently modern 4K resolution, sitting at the same distance. A GUI re-size mode would be a nice addition for an update, and an increase to 120% (roughly 550 x 770 px) for 1080p screens would already help a lot.
I also find the VST3 version, especially in Cubase, a bit of a waste. Granted, Steinberg does consider VST3 as the „de facto future“, and is also mandatory if you want to use side chaining natively in CubEndo/Wavelab. But ChannelStrip MK2 doesn’t have a sidechain mode for the compressors. Something I’d also like to see addressed in a future update. I also ran into random crashes while using the VST3 version and only dragging around the GUI.
Despite of the minor routing and compressor setup issues, on top of the smaller GUI, I do like that this channel strip comes with two compressors, while either one can be put into Expander mode. Usually you only have an EQ/Compressor combination, sometimes maybe even a Gate. Routing was also barely addressed until outside the box thinking picked up drive during the last couple of years. So this is definitely a welcome sight.
The EQ on the other hand can’t be any more simple to use. All you need to do is listen. It is versatile and sounds great on pretty much every material I’ve thrown at it: vocals, drum loops, guitar, individual tracks. Though I’d love to at least have a switch for a less steep HPF, and a mode to turn off the LPF if I boost the high shelf. Then again, it’s part of the character of this EQ. It is walking a fine balance between 08/15 digital/surgical EQ’s, and more modern „vintage EQ emulations“.
The Verdict
This plugin caught me off guard. Granted, it is not a channel strip as known from clones of SSL / NEVE, or more modern tools like Metric Halo and Eventide. That is not its main aim. ChannelStrip MK2 has its own charm, while trying to be as flexible as possible. That is definitely a good thing.
If you’re not covered in that area already, the compressor modules alone are totally worth the price. Hornet Plugins kind of outsourced them in form of the MultiComp, but sans the Expander mode. Then again, with a bigger GUI and external side chain. Though that plugin alone costs about half of ChannelStrip MK2 (editor’s note: at the time the review was written, it was not known that Hornet Plugins was about to release Multicomp Plus).
Agreed, the EQ is nothing you haven’t heard before. Especially considering it’s age (it’s from end 2011) and at times where we are spoiled with excellent freeware to low budget software form the competition (think Tokyo Dawn Labs and Variety of Sound). But the 5+2 band setup is definitely a usable and highly versatile.
ChannelStrip MK2 also works great mixed and matched (i.e. with console preamp emulations). You don’t have to stick to rules – experiment, use only the compressors(s) or only the EQ.
However, this plugin can still be improved here and there (at least in my opinion). Though if you’re looking for an affordable, highly versatile channel strip, then ChannelStrip MK2 is definitely worth taking a closer look.
low on CPU
zero latency (usable for tracking)
no copy protection scheme
great customer support
manual lacking certain information (like filter behavior)
handling of knobs and faders
handling of the routing
lack of side chain capabilities
too small GUI
Format: VST2/VST3/AU/RTAS (32bit & 64bit)
Price: 59EUR (roughly 73,50USD)
5 Comments
Jason
onGreat review, and one I found myself agreeing with completely. I bought this a couple of years back and yet find myself almost never using it because the UI is too difficult to use. The UI itself is too small and hard to read, and the input/output sliders are so small that even a few pixels of movement results in significant audio changes.
I think if Saverio was to redo the UI to bring it up to what others (Slate, NI, IK etc) are doing, this would make it a significantly better product.
Just to say also, that I love the Hornet plugins and regularly use VU meter, SW34EQ, Autogain and Deelay.