

")
")
")

In a time when software instruments are more powerful than ever, it becomes increasingly more difficult to get excited about “the next big thing” when it’s slightly more impressive than the last big thing that just exploded onto the VST market before it. But every so often, we can look forward to something we can truly feel excited about. Falcon from UVI just so happens to fall under that category.
Falcon is summarized as a “Creative Hybrid Instrument”, which is a modest way of putting it. I think a lot of people might instinctively roll their eyes upon hearing the word “hybrid” due to the fact that a new hybrid synth goes live almost everyday, but there’s a lot more going on here than just hybrid synthesis.
The Component Hierarchy
Under the hood, there are eight synthesis oscillators, seven sampling oscillators and a veritable arsenal of filters, effects, event processors and powerful modulation sources embedded within a multilayered structure referred to as a “component hierarchy”, which is a bit difficult to explain, but I’ll give it a shot…
Falcon becomes a little confusing if you don’t first become familiar with its sophisticated architecture, which is one of the most immersive programming environments I’ve encountered, so it’s of paramount importance that you learn to navigate Falcon’s structure in the “Tree” tab within the left sidebar, with collapsible/expandable nodes specific to each level of the component hierarchy.
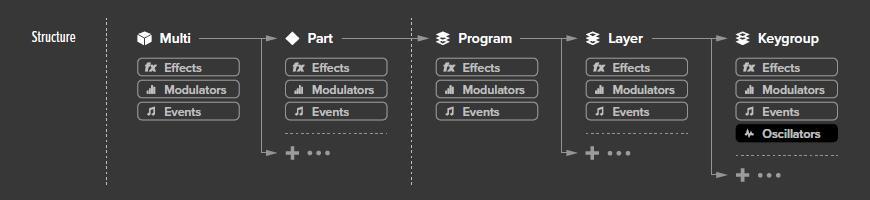
The highest level is a “Multi” with settings in the top bar and the “Parts” tab (also within the left sidebar). Each Multi consists of one or more “Parts”. Each Part will contain a “Program”, which will contain one or more “Layers”. Each Layer will contain one or more “Keygroups”, and each Keygroup will contain one or more oscillators. If you’re new to Falcon, you might struggle with the learning curve, but I assure you, once you’ve managed to get your arms around the component hierarchy, the real joy of Falcon begins.
Another important part of Falcon’s architecture is the Mapping Editor under the “Edit” tab, which allows you to combine synthesis and sampling oscillators in a variety of ways across a key/velocity range. Every time you drop an oscillator into the Mapping Editor, a new Keygroup is automatically generated, which you can see listed below the “Layer” node (if expanded) within the Tree menu. This is just one Layer in one Program in one Part, which should give you an idea of just how many components you can pile up – if you care to – within a single Multi. That’s an extraordinary amount of firepower!
Eight Synthesis Oscillators
Okay, that’s enough technobabble. Let’s move on to the synthesis oscillators, starting with the Analog oscillator, which offers six basic waveforms (sine, saw, square, triangle, noise and pulse) all of which (except for noise) interact with the “PWM” parameter, altering the waveform’s symmetry. The “Starting Phase” and “Polarity” controls allow you to create any combination of phase fluctuations. Unfortunately, the Starting Phase knob won’t shift the phase in real time, which isn’t the end of the world, but I would just love to modulate this parameter if possible in the future. Also, there’s a powerful unison engine with up to eight voices and a small handful of very useful options for phase, stereo and detune spread.
The Analog Stack oscillator is made up of eight stripped down versions of the Analog oscillator with the same basic controls, except for unison, but don’t despair. Just think of it as an eight voice unison engine that behaves exactly how you want it to; this time, you can fine tune the pitch of each oscillator in a very specific way, using any one of the controls for Octaves, Semitones, Cents or maybe you want to perform with a MIDI controller and you need to make assignments to the Pitch knob for fast results in a single gesture. I made a program called “Sine Lab” for that very purpose. Seriously, there’s a lot of potential here, especially considering how many Program Layers are at your disposal.
Now let’s look at the Drum oscillator. On hand, there are two main sound sources: a pitched oscillator with a small handful of basic waveforms (sine, saw, triangle and pulse) and a base “Frequency” control. In the “Pitch Modulation” section, there’s a dropdown menu with three waveshapes: “Exponential” is a rapidly decaying envelope, which is the most obvious choice for more traditional drum sounds. “Sine” needs no explanation, but I’ve found this surprisingly useful for experimental percussive sounds at high modulation speeds. Obviously, the “Noise” shape is somewhat self explanatory, but takes on a crackly vinyl characteristic (also when set to high modulation speeds). A very simple Attack & Decay Envelope will attenuate the pitched oscillator’s output. The Noise oscillator has similar controls, but also includes optional linear and exponential decay. Within the “Master” section, there are three level faders (O/P/N) for adjusting the velocity sensitivity of both oscillator outputs and the overall depth of pitch modulation. There are four more level faders for “EQ Gain”, “EQ Frequency” (peak EQ) “Distortion” and “Volume”.
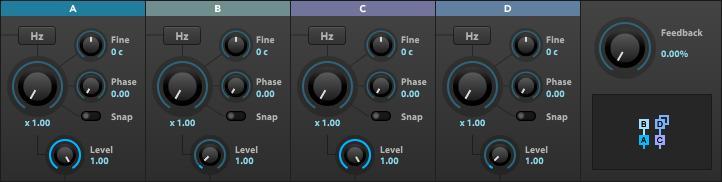
Within the FM oscillator – implemented with phase modulation rather than frequency modulation – you have four operators, each of which have frequency “Ratio” and “Level” controls that determine the pitch in relation to the fundamental frequency and the amplitude of that frequency. There are eleven block diagrams (algorithms) to choose from within the “Topology” menu, plus a “Feedback” control adjusting the signal output fed back into Operator D. When I first demoed the factory sounds included in the FM oscillator, I was a little underwhelmed by the complete absence of modulation envelopes, and then a lightbulb went off in my head… DUH… there are more than enough modulation sources available in the Modulation Browser (I’ll get to that later) that you can route to almost anything your little heart desires, including the Ratio, Level and Feedback controls in the FM oscillators. So yeah, that takes care of that. Also, the updated v1.1 reissue has all new fine tuning and phase controls for each operator, and a nifty little “Snap” button that will adjust frequency ratio by integer multiples of the fundamental frequency!
The Noise oscillator includes over a dozen different types of noise and a global value knob assigned to one of five very specific characteristics of the noise selected: bandwidth, rate, density, color, and chaos. Of course, seven out of fifteen prefiltered types of noise don’t feature any of these five basic controls. I’ve found the Noise oscillator especially useful in tandem with the Comb Filter (which I’ll discuss later) in physical modelling experiments. It would be awesome if we could somehow crossfade between noise types or maybe route a modulation source to that parameter… My imagination is running off with me.
Next on the list, we have a capable Organ oscillator with nine drawbars, each representing harmonics relative to the fundamental frequency. Within the “Percussion” section, there’s a “Harmonic” control that duplicates any one of the nine harmonics and applies a rapidly decaying envelope to its signal output. The “Fast” button will increase the rate of decay. The level and panning controls for each of the nine drawbars – similar to most parameters in Falcon – feature a context menu with options allowing you to add or edit modulations or make assignments to macro controls or host automation within your DAW.
The Pluck Oscillator is by far and large one of the coolest physical modelling engines I’ve had the rare privilege of using. What makes it so wonderfully original is the way it combines synthesis and sampling oscillators in a single environment to allow for some really inspiring sounds. In the “Mixer” module in the “Excitation” section, there are three volume controls attenuating the signal output of the three main sound sources: A Noise oscillator, a Synthesis oscillator and a Sampler. In the top-left pane, you can select a factory sample from within the dropdown menu, displaying half a dozen sample categories: Attack, Basic, Bass, Bowed-Brush, Long-FX and Metal. Of course, if you want to use your own sounds, you can drag and drop any supported audio file into the sample area from within the File Browser. I’m afraid I can’t tell you what’s happening within the synthesis engine, but whatever is going on here is engineered to feign the general behavior of a plucked string, with a good number of controls allowing you to fine tune the pick attack, contour and dynamic of almost any plucked instrument you can think of.
Also, the Noise oscillator interacts with many of the same basic controls in the “String” section, but I can distinctly hear a Karplus-Strong algorithm applied to the noise. At first, I was a bit disappointed that the sampler engine doesn’t respond to the Pluck oscillator’s internal amplitude envelope, but then the same lightbulb flickered on in my head; you can simply drag and drop an envelope from the Modulation Editor onto the “Sample” level fader, and with the flick of your wrist, you have a dedicated sampler envelope! Also, the updated version has some new sampler controls (Start, Detune and KeyFollow), a Sustain button for the Noise Oscillator and a Stereo mode button for the signal output when using two strings.
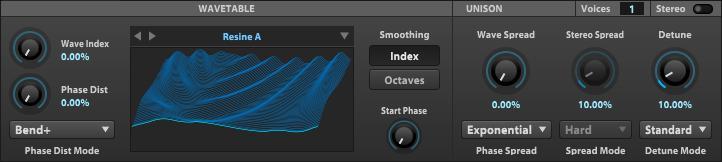
Overall, I’m very happy with the Wavetable oscillator. Most developers “streamline” wavetable engines in typical hybrid instruments, squeezing out painfully unimaginative results. Seriously, UVI could have just phoned it in here; instead, they made a point to make a powerful wavetable engine that doesn’t just offer a basic set of controls, but also demonstrates an extraordinary amount of waveshaping capability.
Right out of the gate, the Wavetable oscillator ships with an ample supply of factory preset wave files, from basic “Single” waveforms to “Multi” wavesets, organized into several categories and represented by thumbnails in a context menu within the Preset Browser. Also, you can drag and drop any supported audio (or image) file into the wavetable area to create your own sounds. If you select any one of the Multi wave files, the “Wave Index” knob will scan the wavetable array. Don’t forget that you can also drag and drop any modulation source from within the Modulation Editor onto any one of the six knobs, including controls for a powerful unison engine, the starting phase of each individual waveform, plus a “Phase Distortion” knob with just under a dozen distinct “Phase Distortion Modes”.
Seven Sampling Oscillators
Almost any common, garden variety “hybrid” instrument will offer a sampler module or maybe some poor excuse of a granular engine less than deserving of its classification. This is unfortunately the case in many modern hybrid synthesizers: a “Jack-of-all-trades” that graduated at the bottom of its class in every subject. But fortunately, Falcon is a rare exception. That doesn’t necessarily mean that each of its seven Sampling oscillators are overflowing with features. On the contrary, some of them are actually very simple, like the basic Sampler oscillator, which only has a few controls for adjusting the playback and transposition settings. But when you get to more advanced things like granular and time stretching, UVI developers have worked very closely with the beautiful minds at IRCAM (Institute for Research and Coordination Acoustic/Music) to explore the cutting edge in sample-based processing.
Granular sampling, which is still a hot topic among computer scientists and engineers studying and teaching in research centers and universities all around the world, is one of the most experimental aspects of modern sound design. But to this day, there is no definitive granular engine. That being said, even though Falcon’s “IRCAM Granular” and “IRCAM Multi Granular” oscillators aren’t professed as “the definitive granular sampler engine”, they come dangerously close to accomplishing precisely that.
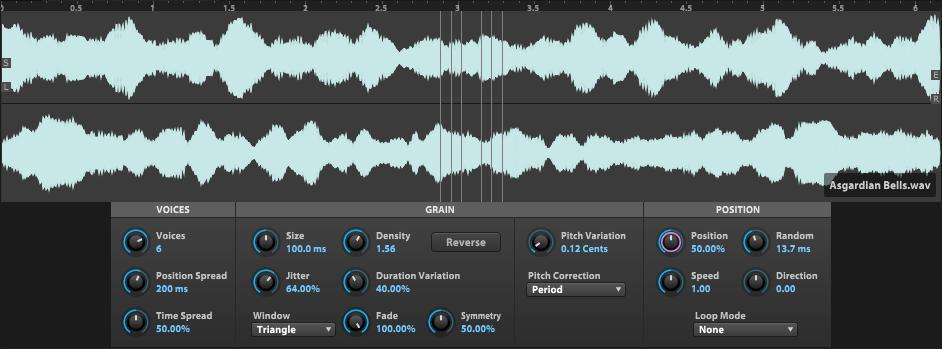
All that distinguishes the Multi Granular oscillator from the more basic Granular oscillator, other than the “Reverse” button that will reverse the grains – and not the sample playback – is the “Voices” section, with up to eight “unison” voices, or at least that’s how the user manual describes them. But I think it’s important to clarify that these are not uniform unison voices in the traditional sense. Each of these eight voices or “grain streams” are actually very similar to a single instance of IRCAM Granular and are not duplicates of just one processed signal, but are each a separate process on their own, even though they receive event data from parameters in the “Grain” and “Position” sections. The “Position Spread” parameter equally distributes starting point positions along the sample file and will overlap audio data with high density settings and long grain sizes, an effect that becomes even more noticeable with the “Time Spread” parameter at high values, staggering the trigger times and shuffling audio like a deck of cards. IRCAM Multi Granular is one of few granular engines with multi-voice processing of this variety.
For years, I’ve been looking for a time-stretch/pitch-shift algorithm that transposes pitch and preserves tempo data without turning the source audio into a garbled mess. Eventually, I gave up hope that such a thing would ever exist… but now it does! Even though Falcon’s standard Stretch oscillator is adequate, I much prefer the more sophisticated IRCAM Stretch oscillator (also included in Falcon) that deviates from more typical resampling methods and implements something called a “phase vocoder”, scaling the frequency and time domains in accordance with phase information, which results in a much more fluid playback and doesn’t produce annoying, “grainy” artifacts; of course, IRCAM Stretch is substantially more CPU intensive, but taking the truly superior audio quality into account, I think it’s well worth the hit.
There are also five modes in the “Options” section within the IRCAM Stretch oscillator allowing you to “preserve” very specific aspects of the source audio. “Transients” mode is ideal for percussive sounds, or anything with a distinct dynamic range. “Envelope” mode is more or less an envelope follower, even though I’m not certain how the resultant signal interacts with phase information. “Shape” mode is ideal for monophonic sounds, intent on preserving the character of the waveform. “Stereo” mode preserves the phase correlation between left and right stereo channels to avoid unwanted phase shifts during the stretching process, and “Legato” mode preserves the playback position when new notes are triggered.
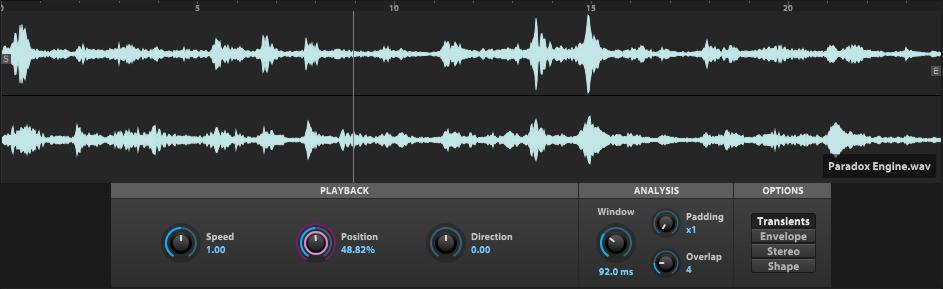
Here’s another example of what happens when you start tinkering with oscillators without taking time to learn Falcon’s architecture, and how modulation sources and event processors are meant to be used with oscillators and effects. After I first tested the IRCAM Scrub oscillator, I was incredibly disappointed by how stationary the results were… until I finally realized that I wasn’t actually “scrubbing” the audio, which is obviously the whole point of a scrub oscillator, right? Yet another lightbulb went off in my head: What if I simply routed the mod wheel to the “Position” knob by right-clicking on it, then selecting the “MIDI Learn” function within the context menu? Sure enough, with the slightest touch of the mod wheel, I was scrubbing audio with effortless ease. I then realized that I could also route any one of Falcon’s eight modulation sources to the “Playback” controls in the IRCAM Scrub oscillator, and did so with the “Multi” envelope, which I also routed to the Position knob, producing the general characteristic of the “Jitter” controls in the granular oscillators when set to high modulation speeds. All of the controls in the “Analysis” and “Options” sections are exactly the same as in both the granular oscillators, with a small handful of controls for oversampling, grain size/overlap, and the same “modes” I’ve already explained.
The Slice oscillator does exactly what you expect it to, plus some things you might not have expected. Obviously, you have basic controls for adjusting sample playback in accordance with time signatures and duration in bars and beats, but you can also create a new layer of slices mapped to individual keys when you click on the “Map” button. The new layer will appear in the Tree Menu titled “Mapped”, which also mutes MIDI note data for “Layer 1” so you don’t trigger multiple samples during live performance. Another really cool feature is a dedicated amplitude envelope which is applied to each individual slice, allowing you to feign the general characteristic of a transient shaper. Also, there’s an export function via the “WAV” button that lets you drag and drop a new audio file (complete with all new settings applied) to your desktop or any prefered file location. You can even drag and drop a temporary audio file onto the sample area, but you cannot map individual slices until you save it to your hard drive; a nag screen will appear asking you to do this, and if you don’t, Falcon crashes. So yeah, try to be careful with that.
Eight Modulation Sources
Okay, from here on out, I’ll be going over modulation sources, event processors and effects in a much more summarized fashion. Let’s just face it; Falcon is a monster, and if I go as deep into it as I’d prefer, I’d be writing this review all year, and you’d be reading it all week. Anyway, here goes…
Six out of eight modulation sources are envelopes. “AHD” and “DAHDSR” have the same basic design, the latter having three additional “phases”: delay, sustain and release. I was actually very surprised by the length of decay time… thirty seconds? I’m hardly ever going to use anywhere near that much decay, but I’m impressed! The Multi envelopes are also very similar to both the AHD and DAHDSR envelopes, with a zoom in/out display and basic controls for adjusting velocity sensitivity; clearly, you have multiple envelope points, “Speed” (time multiplier) and “Smooth” knobs, and a nice long list of patterns available in the preset browser. I usually don’t use presets, but I’ll admit there’s a lot of really useful stuff on hand.
The “Attack Decay” envelopes are ideal for FM synthesis and physical modelling, with a unique attack phase scaled as a percentage of the decay time. The “Analog ADSR” envelope is the most common, which is automatically generated as a dedicated amplitude envelope for synthesis oscillators by default. Bipolar faders adjust the attack and decay phase in accordance with MIDI note velocity and key follow, and “Dynamic” will adjust the level of the envelope’s signal output. The “Step” envelope has up to 128 steps, a tempo syncable “Frequency” knob, “Bipolar” mode with negative and positive values, and two “Interpolation Modes” being “Hold” and “Spline”, which iterates every step as a continuous spline curve.

The LFO module is a versatile little workhorse with ten waveforms including the usual suspects: Sine, Square, Analog Square, Ramp Up/Down, Random Sample & Hold, Triangle, and also two “Chaos” waveforms (derived from the Rössler and Lorenz equations in chaos theory) plus a drawable “User” waveform. There are also Phase, Frequency, Depth, Delay, Rise Time and Smoothing controls that you can use to create very natural and organic or even wildly spastic control signals that defy classification.
The Drunk module is based on a “random walk” system, which is a mathematical formula designed to create random “steps” at arbitrary times. Unlike the Rössler and Lorenz waveforms in the LFO module, both of which have a stationary shape, values produced by the random walk are generated in real time. The resultant signal emulates a phenomenon similar to the brief fluctuations of a diffuse stereo image or the deviant behavior of pitch drift. The “Initial Value” knob will adjust the starting point of the signal, and the “Bandwidth” knob will adjust the signal’s speed. The “Bias” knob will adjust the ratio between minimum and maximum values, and the “Smooth” knob will adjust a ramp between those values in Hz.
Four Event Processors
The MIDI Player allows you to trigger MIDI sequences (saved as “.mid” files on your computer) with any one of Falcon’s sixteen MIDI input channels, each of which have a dedicated bypass button. You can load a MIDI file into the player via the “Browse” button. The “Bass Note” determines the note that will trigger a sequence in two ways: If you toggle on the “Transpose” button, which is selected by default, you can trigger a sequence in accordance with MIDI note pitch. If you deselect the Transpose button, you can trigger a sequence only with the Bass Note, which is especially useful for running several instances of the MIDI Player in one program, loaded up with multiple MIDI sequences mapped to a very specific key range. Also, the “Loop” button will loop playback of the MIDI file, and the “Auto Play” button will assign playback control to Falcon’s internal transport (the Play and Stop buttons) in the top toolbar.
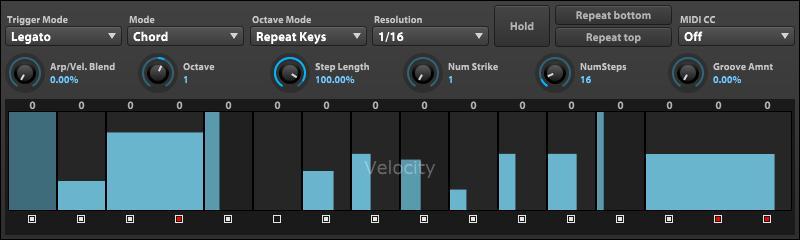
Of course, no “creative hybrid instrument” would be complete without a flexible Arpeggiator, and we get precisely that; Falcon’s Arpeggiator has up to 128 steps on offer, each with adjustable note lengths and levels and discreet link and tie functionality. There are three “Trigger Modes” and twenty-seven “Mode” patterns: Up, Down, Down & Up, etc. With “Octave Mode”, you can transpose notes in two basic ways: If the bipolar “Octave” knob is set to a value greater (or less) than zero, chords will iterate patterns that will either repeat within each octave or each note in a pattern will shift up or down one or more octaves. I just love the way you can fine tune the note length by holding the “shift” key, left click and dragging your mouse from left to right, which is incredibly workflow efficient. I have only one feature suggestion, which is a menu specifically for musical scales. I understand this could be done with a MIDI sequence, but I think it would be really cool if we could arpeggiate scales and modes with just a few mouse clicks.
The Micro Tuner allows you to import Scala tuning and keymapping files supported by the open source Scala freeware application that uses GTK+ (otherwise known as the “Gimp Toolkit”). The Note Grid displays each of the twelve notes in the chromatic scale in ten octaves from left to right, top to bottom. One thing that would have been really useful is the ability to edit tunings from within Falcon, but it looks like you’ll have to become familiar with the Scala software if you want to create your own tuning files.
I’m really impressed with the Script Processor, which includes almost two dozen factory scripts. I know literally nothing about the “Lua” programming language, but after having so much fun with the “Chorder” and “Tonal Harmonizer” modules, I’ve become very interested in the fine art of custom scripting. Within the Script Processor, you can load “.lua” files from anywhere on your computer, edit them in an external text editor of your choice, or keep an eye on debug and print messages in the Script Console Output.
Filters And Effects
I’m sorry, I can’t possibly cover everything that falls under this category. There’s just too much here. In past reviews, I’ve made a point to leave virtually no stone unturned, but Falcon has over eighty effects and fourteen filter types, so for my sake and yours, I’m just going to highlight the brightest of the bunch.
As far as the filters go, my personal favorite is the Xpander Filter, with thirty-seven frequency curves, each of which are illustrated by a thumbnail in the Filter Mode display. There are anywhere between 1-4 pole topologies for lowpass, highpass, bandpass, allpass, notch, peak and twenty combinations and “Twin” filters with mirroring curves. I often use the “N2P2N2T” curve, which is like having a lowpass and highpass filter hugging a resonant peak band; this filter is especially useful for noise sweeps and also when the filter is self oscillating, having cranked the Keytracking knob way up in Linear Distortion Mode.
Of course, I don’t mean to marginalize or in any way diminish the overall usefulness of Falcon’s other amazing filter designs. I just usually use the Xpander because it has so many filter combinations on tap, I hardly feel a need to reach for anything else. But in pursuit of otherworldly sounds, I have made use of the Comb Filter, which is actually very simple, having just two knobs for Cutoff and Resonance, and two settings for Plus or Minus modes, either resulting in positive or negative feedback. I’ve also made use of the Vowel Filter, which is surprisingly crystal clear. I’ve found that the vast majority of formant filters sound horribly muddy, so I’ll be having loads of fun with the Vowel Filter in future sound design projects.
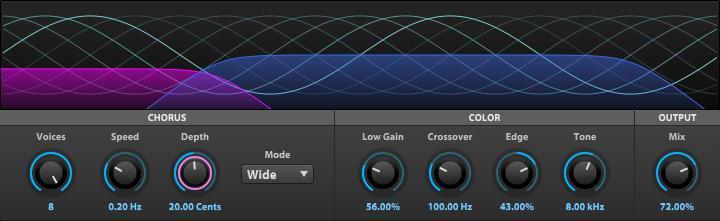
Included in version 1.1, Thorus is a variable 8-voice chorus effect that was originally made for reducing harsh artifacts, “smearing” the source audio to produce a rich, wide, swirling wall of sound. The graphic display has a visual representation of the number of voices illustrated by a series of phased sine waves indicating both the depth and speed of modulation determined by the “Chorus” controls, and the filtered signal attenuated by the Low Gain, Crossover and Tone controls in the “Color” module. I’m actually very surprised by the feather-light CPU hit, which is simply unheard of for a multi-voice effect, even though modulating individual parameters will add to the payload. I especially enjoy modulating the Depth knob, which almost sounds like a vintage flanger effect when you push the “Edge” knob beyond fifty percent, boosting the level of filtered feedback in accordance with the Crossover frequency.
The Dual Delay is one of the most flexible delay modules I’ve ever used. The visual representation of stereo and phase information helps the user manage elaborate delay lines… and it looks really cool too! The “L/R” knob will offset both the left and right delay times, scaled as a percentage of the “Time” value, which I’ll admit is somewhat disorienting since you can’t see the left and right time values individually. The Feedback knob also has a corresponding L/R knob that works in a very similar way. The “Rotation” section has three controls allowing you to offset the phase of the input, feedback and/or output signals, and you can also determine the stereo width of both the input and/or output within the “Width” section.
SparkVerb isn’t just another exceptional reverb; it just so happens to be, hands down, without a doubt, my absolute favorite reverb in the scope of existence. Even though the Falcon version doesn’t include the preset morphing system featured in the Mac AU / Windows VST version, this ever-so-slightly scaled down version sounds just as incredible as its increasingly popular third-party counterpart. You can dial in subtle or immense spaces with anywhere between half a second to fifty seconds of decay. There are three Modulation Modes (Lo-Fi, Dark and Bright) that determine the modulation interpolation style, and three Density settings (Low, Medium and High) that determine the overall echo density. There are also controls for low and high frequency bands that will either adjust the decay response across frequencies in accordance with the “Crossover” knobs or adjust the decay ratio relative to the global decay time with the “Lo/Hi Decay” knobs. Another really cool feature is the Freeze algorithm, which is silky smooth and surprisingly artifact free, so there’s nothing harsh or overly repetitive clunking around under the hood.
Falcon’s Effect Rack allows you to pile up any combination of effects in a separate path that will appear in the Tree menu within the left sidebar and also within the Effects tab, where you can route parameters to macros in the front panel, and then save your effect rack as a “.preset” file in the folder structure.
The Verdict
I honestly don’t even know where to begin. Falcon is quite literally the “be-all end-all” hybrid instrument, which has not only measured up to every single one my lofty expectations, but has surpassed them by a hundredfold. As a Falcon user, I could easily part with every other instrument/effect plugin I own, yet still walk away completely satisfied, knowing that everything I will ever need is here… and then some!
However, I wouldn’t recommend Falcon for anyone who dislikes immersive programming environments, because that’s exactly what you’re gonna get. This isn’t just some trendy new synthesizer, it’s a serious program for serious people… but that doesn’t mean that Falcon is hard to use! On the contrary, you can drag and drop almost anything anywhere. It’s also tons of fun! But you must learn the lay of the land before you hit the ground running, lest you find yourself lost in an a maze of tabs and dropdown menus.
Anyone familiar with my reviews will know just how much of a stickler I can be when it comes to ratings, so trust me when I tell you that I put an extraneous amount of thought into my decision to award Falcon a perfect 10/10 score. I doubt that we’ll see a virtual instrument such as this one for quite some time. Brimming with well over a dozen synthesis and sampling oscillators, several modulation sources, event processors and effects, Falcon just might be the first and last plugin you will ever need to purchase.
More info: Falcon ($349)
Last Updated on April 28, 2016 by Tomislav Zlatic.
UVI Falcon Review
Anyone familiar with my reviews will know just how much of a stickler I can be when it comes to ratings, so trust me when I tell you that I put an extraneous amount of thought into my decision to award Falcon a perfect 10/10 score. I doubt that we’ll see a virtual instrument such as this one for quite some time. Brimming with well over a dozen synthesis and sampling oscillators, several modulation sources, event processors and effects, Falcon just might be the first and last plugin you will ever need to purchase.
-
Features10
-
Sound10
-
Workflow10
-
Performance10
-
Design10
-
Pricing10