

")
")
")

As a music producer, you want to make tracks that sound great. If you read our music mixing guide, check out these 10 mixing ideas to further improve your music production skills.
Producing music on a computer with a digital audio workstation seems easy. Drag and drop a beat together, supplement it with some melodies and vocals, add some VST plugins, and your hit record is ready. Yeah, right.
The music production process looks simple on paper, but the reality often kicks in to prove otherwise! Producing a great-sounding mix is hard work. It takes time, knowledge, practice, and patience.
Mixing music is the tricky part of home production. You sometimes feel more like a technician than a musician. And no matter how many mixing tips you read, there’s also the difficult question – where do you start the mixing process?
See also: How To Finish Tracks: 10 Music Production Workflow SecretsDo you compose the song first and worry about the production later? Should you mix while working on the arrangement? But thinking about EQs and compressors while composing will disrupt your creative workflow, no?
We are here to answer these questions.
Before we continue, check out my new EP (De Facto – Serein) that was released recently. Discover how I mixed it using the step-by-step mixing guide below.

Follow these mixing ideas for the perfect mix
Mixing is an ongoing process. The more you do it, the better you get at it. These ten steps provide the basic mixing workflow structure.
1. Decide what you want to achieve with your track
In a busy mix, many sounds compete for the listener’s attention. Therefore, think in advance about the feeling you want to reinforce.
If it’s a dance track, the beat is probably the most important. If you’re making emotional pop, you probably want to emphasize the vocals.
Listen to your track with fresh ears and take notes.
What do you notice, what do you want to emphasize, and where does the attention diminish?
Decide how your track should sound before you even touch a fader. Having that perfect mix in your mind (or even described in detail on a piece of paper) will help you make decisions more easily while producing.
2. Create an overview
Color coding and naming tracks will speed up the mixing process.
Mixing takes a lot of time. Therefore, provide an overview and group similar sounds in busses and track folders.
I always make folders and busses with different colors:
- Drums (red)
- Bass (blue)
- Synths (orange)
- Acoustic instruments (green)
- SFX (yellow)
This way, I can visually identify any part of an arrangement. My DAW (Studio One) colorizes mixer tracks automatically as well. This way, I immediately see what a channel does.
Give each track a logical name as well, if you haven’t done so. Sort them vertically from important to less important. The kick, clap, and hi-hats are always on top of my arrangement. They determine the groove and are the most critical elements for the records I make.
Do you make pop music and record the audio yourself? Then it’s a good idea to remove any “dead air” in the recorded audio clips. Those are the pieces of audio where nothing happens.
Trimmed audio clips make it far easier to see what’s happening in your arrangement.
3. Make a rough mix with balance and panning
You don’t need expensive VST plugins to make a good sounding mix. In fact, you can go a long way with volume and panning only.
Set your master fader to 0 dB and take your notes from the first step of this guide. Now start with the most important element in your mix.
I make dance music, and that’s why I always start with the kick. It is the foundation of my music, and I build the rest of the mix around it. As you move on, always switch the tracks on and off to hear whether the relative volume between them is still correct.
As for the panning, allow the kick and bass to occupy the middle of the stereo field. They are the foundation of your track.
Other sounds can be placed left and right of the center, just like a music band on stage. Not everyone stands behind the singer. There are musicians left and right as well.
Create an exciting and balanced stereo image for your listener. Your mix is really coming to life now.
4. Take care of headroom
The rough mix will take your song more than a few steps towards perfection. But you aren’t there yet. Another thing to consider is the headroom.
Sounds react to each other, and you need “headroom” to prevent clipping. Hard clipping happens when the signal on your master channel exceeds 0 dB, causing the sound to distort.
Here’s what I do to prevent that from happening:
- Set the fader of your master channel to 0 dB;
- Select all audio channels in your mixer;
- Play the busiest part of your track;
- Take a good look at the volume on your master channel;
- Simultaneously lower the volume of all selected channels so that the master fader peaks at -8 dB.
This way, you have 8 dB headroom when you’re mixing, and you prevent your master bus from clipping later on.
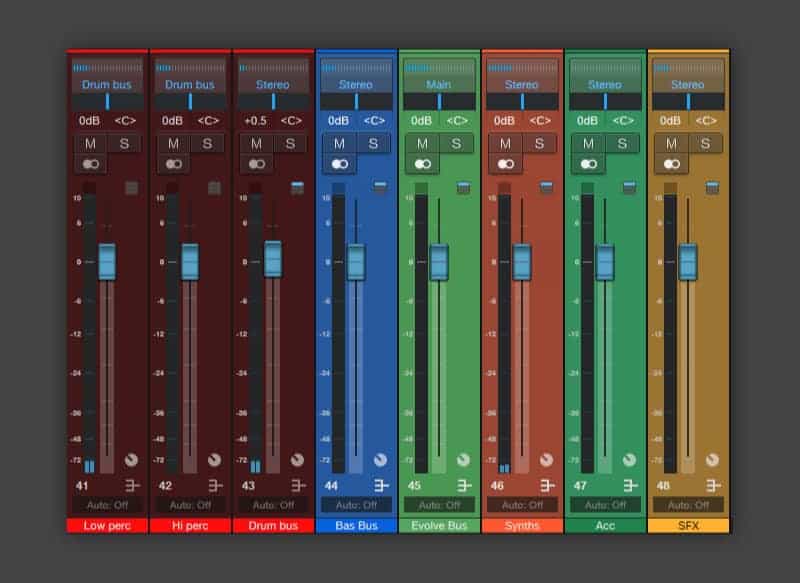
5. Create mix busses
The next step is to create busses in your mixer. These are separate channels where you can bundle multiple sounds from a particular group. I always use the following mix busses:
- Low percussion
- High percussion
- Drum bus
- Bass bus
- Synth bus
- FX bus
I send the low and high percussion to the drum bus. You can do this for other buses as well, such as low and high synths or lead and backing vocals.
The great thing about mix buses is that you can edit groups of sounds simultaneously. For example, compress all high percussion sounds at once.
The relative volume of the bussed parts will remain the same if you turn the volume up or down on the bus channel. This saves time when you want to volume up the entire drum set, for example.
6. Create FX busses for send effects
The advantage of using FX sends is that you will use fewer plugins. Instead of loading ten instances of the same reverb plugin per project, you can send ten different channels to a single reverb.
This method offers multiple benefits. It saves time and makes your project sound more coherent while allowing your DAW to run more efficiently.
I always add the following Send Effects for mixing:
- Short delay;
- Long delay;
- Short reverb;
- Long reverb.
When I’m not satisfied with the result, I can always add a different delay or reverb as an insert effect.
7. Choose the perfect reference track
There’s one major thing you can do before finally producing the perfect song. That is choosing the right reference track.
An excellent reference track should be a professionally mixed song that you’re familiar with and closely resembles that “ideal mix” you imagined in step one. Also, don’t use a heavy metal track as a reference for a jazz mix. Make sure it’s an “apples to apples” comparison.
Import the reference track into your DAW and loop the busiest part in your track. Match the volume between your mix and the reference track. Compare the two and try to answer the following questions:
- How does the stereo image sound?
- How loud are the sounds relative to each other?
- Does your song sound too shrill or too bassy?
- Do you hear any annoying frequencies in your mix?
By listening and comparing, you can now make targeted adjustments to your mix.
8. Use EQ, compression, reverb, and delay
Now it’s time for the final mix. With the rough mix from step three, you determined the feeling and the direction of your song. Now you can polish it, starting with EQ.
If many sounds are played simultaneously, their frequencies will overlap. This will make your song sound untidy and undefined. You can solve the problem with EQ.
8.1 Mixing tools: Equalizers
The equalizer will let you amplify or attenuate specific frequencies in a sound. Let’s suppose that a guitar riff and the bass line share certain frequencies (this is most often the case). They will get in each other’s way, resulting in a muddy mix.
The big question then is: who’s the boss in this frequency range? The answer largely depends on the situation.
If your rhythm guitar and bass guitar are competing, use the EQ to filter out the low frequencies from the rhythm guitar part. This makes the guitar sounds thinner on its own, but it will gel perfectly with the bass guitar. Both sounds now get their place in the mix.
8.2 Mixing tools: Compression
With a compressor, you’re lowering the dynamics of a sound. Imagine a singer who sings unevenly, delivering the verses softly and going quite loud during the chorus. With a compressor, you lower those loud parts to match the quiet ones.
Compression reduces the difference between hard and soft sections of a track by ‘squashing’ the sound. Once compressed, you can boost the entire track once again so that it sounds louder than before.
Compression is often used in dance music, but try not to overuse it. If you compress too much, everything will sound loud and tiring.
8.3 Mixing tools: Reverb & Delay
Reverb and delay will let you create depth in your mix. Use more reverb on a track to make it sound further away from the listener and vice-versa. By adding this third dimension to your tracks, the entire mix will come to life.
Of course, you can use many other effects in tandem with EQs and compressors. Keep in mind that the effects will influence the frequency balance and the volume of your mix. You may need to readjust the EQ and compressors again afterward.
9. Take plenty of breaks
Mixing is exhausting, both mentally (since you’re making many creative decisions in a short period) and physically (to your hearing). Therefore, take regular breaks and give your ears some rest. If you go on for too long, your ears will get tired.
More often than not, the result is a mix that sounds great in the evening and terrible when you wake up.
The remedy is taking regular breaks when mixing. Let your ears recalibrate and listen to some quiet background music while you rest.
If you have time, try to spread the mixing session over several days. Surprisingly, this might even save you some time because you won’t go back to readjust the same mix multiple times.
10. Stop if you can’t add anything more
Modern digital audio workstations have limitless possibilities. You can’t run out of tape, and you can’t run out of mixer channels. That’s both an advantage and a disadvantage.
The negative consequence is that you might get tempted to tinker with the same mix forever. At some point, this constant tinkering won’t benefit the end result, and you may get fed up with your own song.
Therefore, you should know how to stop mixing at the right time. This brings us back to step one. If you start with an idea of what the mix should sound like in the ned, it will be easier for you to realize that you’re there.
Do you think that your mix sounds good enough? Then save it and start with a new track. A mix is never perfect. By stopping at the right time and making a lot of music, producing will remain fun instead of turning into a never-ending hamster wheel run.
Conclusion: Yes, you can make a great mix!
For years, I found mixing complicated and tedious. That was the case until I took a broader look at the mixing process itself and discovered that it is not that complicated at all.
You just need to stick to a few rules:
- Know what you want to achieve with your song;
- Learn to use the main mixing tools – EQ, compression, reverb;
- Trust your ears. If it sounds good, it is good;
- Produce and mix lots of music;
Don’t be too hard on yourself, and try to finish songs quickly.
If you do this, your productions will keep sounding better and better. And hey, you just might become a world-famous producer one day 😀.
Good luck with your mixes… and don’t be afraid to amaze the world with fantastic tracks!
Read our music mixing guide for more information.
Follow De Facto: YouTube | Instagram | Aurora EP
More articles:
- Free Music Production Software
- BPB Saturator Is A FREE Tube/Tape Saturation VST Plugin
- Download FREE BPB Dirty Filter Drum Breaks By A.J. Hall
- Free Autotune VST Plugins
Last Updated on May 5, 2023 by Tomislav Zlatic.