FabFilter, who by consensus can seem to do no wrong with their plugins, are now offering Pro-R, the company’s first ever reverb plugin.
Ah, reverb. My best friend and worst enemy. Nothing dates your music better than reverb (80s snare drums, I’m looking in your direction), and controversially, I don’t think I’ve ever been entirely happy with a reverb sound during production. Conversely, it’s also the element that brings realism and depth to our mixes.
User Interface
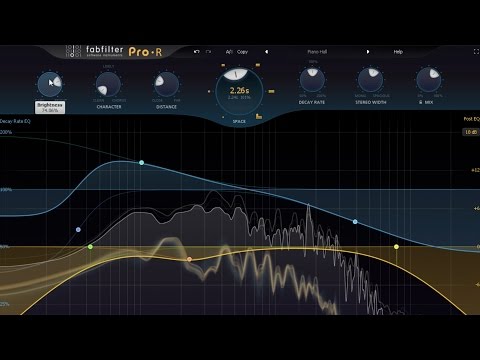
In keeping with the current range of FabFilter plugins, Pro-R is an ergonomic dream. Steering away from modelling the appearance of an analogue unit (which, I have to admit, I think looks awesome in most cases), Pro-R instead opts for a more scientific GUI. Previous users of FabFilter’s Pro-Q plugin will be familiar with the frequency spectrum-style display. Also familiar is the EQ curve, which is yellow in this case. Overlaid on top of it is a blue decay rate curve, which I will explain in more depth below. Everything is laid out for ease of use, with large dials at the top of the GUI featuring the main controls.
The frequency spectrum of the processed audio signal is superimposed on the EQ and decay curves, so you have a visual cue as you work. There is so little latency that everything you alter is instantaneous and smooth, devoid of any pops or clicks, or any significant drain on the CPU.

Regarding the controls, FabFilter appears to have taken a different route. In some ways, they have removed a lot of the very specific controls you might associate with a conventional reverb plugin, such as “Diffusion” or “Density”. Instead, these ingredients are amalgamated into a single control like “Brightness” or “Distance”.
FabFilter describes this as using ‘musically relevant terms,’ which is an interesting concept. Whereas you might use diffusion and early reflections to create a sense of distance, Pro-R cuts out the middleman and, through internal programming methods, offers a single-dial solution. This feature alone will likely determine whether or not you enjoy Pro-R. Some will lament the lack of specific controls, whereas other will enjoy this kind of workflow enhancement.
It’s worth noting that each dial is completely smooth and gradual. There is no short list of modelled room sizes, but an incremental blend between them all.
The Presets
Pro-R comes with over 150 presets which are grouped by size. Pleasingly, these are labelled with their intended purpose, and the ones I tested sounded fantastic, considering their given application. ‘Rhythm Guitar Rich’, for instance, sounded very natural on rhythm guitars, ‘Drum Studio’ livened up a dry drum set perfectly.
See also: Best FREE Reverb VST Plugins!The attention to detail here reassures me that Pro-R was designed to be a practical plugin, and that time and effort has gone into the presets, rather than just naming a couple of vague, generic instrument types. It is also helpful for learning how to treat new instruments. I can’t say I’m terribly familiar with how to process horns in a mix, but the ‘Horns Studio Large’ preset not only sounds great instantly but also graphically shows me a good route to take in the future. Just by looking at the general shape of the curves, it’s possible to reverse-engineer the presets for your own purposes effectively.
Controls
The control parameters are equally intuitive and easy to work with. Each dial carries a brief explanation (accessed by selecting the ‘Show Interactive Help Hints’ option from the help menu).
The first control knob is labelled “Brightness”. This is where the clarity and high-frequency absorption can be set. The dial does exactly as described, with a little less brightness giving a more realistic effect, although I quite liked the higher settings on more ethereal ambient sounds.
“Character” takes the reverb from complete transparency at 0% to a richer sounding space by adding gentle modulation and some early echoes. Go past 50%, and you are approaching chorus territory.
“Distance” is an obvious one, giving the effect of gradually moving away from the source sound as the amount is increased. This is great if you use several reverb sends, set at varying distances to create a deep field of sound.
Positioned centrally on the user interface, the “Space” knob is the largest control. Your attention is drawn to it for a reason, as it’s going to determine the room model for your reverb. Ranging from a tiny space up to a cathedral, with every increment in between, you can also click on the six icons to shortcut to some generic sizes. As with the other controls in this plugin, the room size and decay time are linked, increasing together. However, you do have a modicum of additional control here. The decay time dial is linked to the space dial. When set at 100%, the decay rate remains the same. As you increase or decrease it, the decay time can reach up to double or half of the original setting. You will notice that, as you adjust this control, the display in the Space dial changes, displaying both parameters in blue, and the final decay time in yellow. Note that you can further control the decay rate through the blue EQ curve, described below.
Next is “Stereo Width”, a smooth control which ranges from mono, past 100% where the sound is evenly spread between both speakers, to a maximum setting of 150%. This last setting gives a very unnatural wide sound, with a discernible gap in the centre. This could be very useful in a dense mix, or for making more ethereal sounds.
Finally, the “Dry/Wet” control sits on the far right. I almost always run this at 100% wet on a return track, although there are applications where you might want to run Pro-R as an insert, and this dial gives you a bit of flexibility there.
Now, onto the very cool part. The two EQ curves on the frequency spectrum are what this plugin is actually all about. The yellow post-EQ can handle up to 6 bands, which can be a variety of filter types, such as bells, shelves and passes. The Q can also be altered by command-clicking on Mac OS. This alters the frequency response of the reverb itself and offers a huge degree of control. It’s very simple to sweep around the frequency range and find the area where the reverb sounds natural and musical, and to remove those frequencies where it sounds boxy or too airy. I’ve used plugins which don’t provide any frequency control at all, as well as others where there is only a high and low-pass filter. Pro-R offers a far greater degree of precision than any others I’ve used. Just like the Pro-Q series, an individual colour is assigned to each node, so you can clearly see how each one is affecting the sound.

Maybe the most important feature after the “Space” control is the blue EQ decay control. It superimposed over the EQ curve and can be manipulated in the same way. However, whereas the EQ curve has dB and loudness in the vertical plane, the decay rate shows the percentages which relate to the master decay rate in the “Space” dial.
What this allows you to do is to increase or decrease the decay relative to the master decay rate, at specific frequency points. The decay rate can be extended to 200% of the original value or cut down to as low as 12%.
For instance, imagine that you’ve sculpted a great reverb on a vocal track, but the sibilance is too obvious when the reverb is applied. You can now notch the decay rate in the higher frequencies, so those annoying sounds aren’t hanging in the air, slowly decaying. The rest of your sound has a beautiful reverb giving it depth and a sense of time, but without boosting or drawing attention to unwanted noises.
Another example might be a snare drum, where the punch is coming in at around 200 Hz. However, when the reverb is added, that punch is lost and rounded out with an otherwise pleasing reverb sound. Simply notch out the decay rate at 200 Hz – your reverb sound remains in place, but the punch of the snare cuts through.
If this seems confusing at first, a quick sweep through the presets will show various methods of using the technique. Because of the excellent GUI, it is also possible to seek for problem frequencies and decays in the same way you’d do with a notch filter. Just boost a thin frequency range and sweep it around until you find the problem, then cut it.
Finally, at the bottom is a pre-delay setting, and a short menu to select whether the analyzer shows the post-EQ and reverb (default), pre-EQ and reverb, or is switched off.
Sound Quality
I’ve said much about the individual parameters and what they can do, and very little about the sound of this plugin. In short, Pro-R is a great sounding transparent reverb. In fact, I think it’s best to it as a clean reverb. You can colour the tone slightly, and individualise it massively by tweaking the controls, but Pro-R is more about being a stable reverb that you can keep control of.
If you look at the difference between a vintage analogue equalizer and FabFilter’s popular Pro-Q plugin, that’s pretty much the difference between Pro-R and other “colored” reverb plugins. I recently read an article about the differences between a good mix and a great mix, which talked about the elements of a mix that you don’t really notice, but you definitely register when they are not present. This is really true for subtle reverb, and where some sounds are going to need a huge, obvious reverb to give them the feel and space you’re going for, pretty much everything is going to need at least some sense of distance from the listener.
The Verdict
Pro-R is a workhorse reverb, it’s going to let you add a lot of fine-tuned depth to your tracks and still leave room in the mix for something with a bit more colour. If you watch countless YouTube mixing tutorials, you’ll routinely see producers reaching for a colour EQ, perhaps a vintage SSL emulator, to add a little something to a channel here or there, but it’s Pro-Q doing the heavy lifting on the majority of tracks. Pro-R is the same.
Most producers will have a go-to reverb which works great for making huge lead sounds, and immediately gives the sense of size and depth we are after. Unfortunately, such reverbs leave little room for other elements in a mix, and the cumulative effect is not always pleasant. That’s where Pro-R excels – adding a more precise sense of space across the mix so that it doesn’t become washed out.
I’m not saying that you can’t get a huge, lush reverb sound from Pro-R, you absolutely can. It’s just that this plugin goes beyond sounding great in isolation and is geared towards sounding great in the context of a full mix. As a result of using Pro-R, I’ve now altered my workflow to categorise channels with reverb that I want to hear, and those with reverb that I want to feel. For the latter, I will always be reaching for Pro-R.
Pro-R is currently priced at £149, but is also available in most of FabFilter’s bundles, which make a lot of sense due to how much use their plugins will inevitably be getting.
More info: FabFilter Pro-R (£149)
Last Updated on February 27, 2017 by Tomislav Zlatic.
FabFilter Pro-R Review
Pro-R is a workhorse reverb. It's going to let you add a lot of fine-tuned depth to your tracks and still leave room in the mix for something with a bit more colour, where desired.
-
Features9
-
Workflow10
-
Performance9
-
Design9
-
Sound8
-
Pricing9


